How to install FreeNX on Ubuntu 12.04 Precise Pangolin
 Ask anyone who knows me and they will tell you that I am a vocal (and
perhaps tireless) advocate of FOSS/GNU/Linux. I loves me some FOSS and GNU/Linux and I really like to help others with it as well!
Ask anyone who knows me and they will tell you that I am a vocal (and
perhaps tireless) advocate of FOSS/GNU/Linux. I loves me some FOSS and GNU/Linux and I really like to help others with it as well!So after writing my post: How to install NX Free Edition on Ubuntu 12.04 Precise Pangolin, I will follow it up with a story about FOSS. In this post, I will guide you through some easy instructions for installing the GPL,FOSS NX server variant called FreeNX, and the FOSS "qtnx" client that is used to connect to the FreeNX server.
The main difference is that, unlike NX Free Edition, which is licensed as proprietary ( 2 connections limit), FreeNX and qtnx are completely Free Open Source Software (FOSS, GPL)! Sounds good right? It's music to my ears. Afterall, this FOSS/GNU/Linux stuff makes the Technical world go around for everyone.
Update 01/02/13: Want to try something easier? Simply install xrdp:
1.) sudo apt-get install xrdp
2.) Add this to the ~ of the user you plan on logggin in with:
echo "gnome-session --session=ubuntu-2d" > ~/.xsession
3.) sudo /etc/init.d/xrdp restart
4.) Connect to your xrdp host from GNU/Linux with rdesktop, or from win with windows-key+R, mstsc /v:
2.) Add this to the ~ of the user you plan on logggin in with:
echo "gnome-session --session=ubuntu-2d" > ~/.xsession
3.) sudo /etc/init.d/xrdp restart
4.) Connect to your xrdp host from GNU/Linux with rdesktop
So here are the simple instructions (and a couple of tweaks) that I used to install FreeNX on Ubuntu 12.04 GNU/Linux:
First, you need to add the freenx-team PPA for Ubuntu 12.04 GNU/Linux. Hit CTRL + ALT + t to get your Terminal, then type or paste in the command below, then hit Enter, then hit Enter to confirm the addition of the new source:
sudo add-apt-repository ppa:freenx-teamNext, update your sources list, then install the FreeNX server software (there are two commands below, the 2nd only runs if 1st is successful). After verifying that no important packages will be removed, hit Y then enter to install FreeNX server:
sudo apt-get update && sudo apt-get install freenx
Next, as noted in the community documentation for installing FreeNX - download the missing nxsetup script, untar it, then copy it to /usr/lib/nx (the command below is one entire line that runs 3 commands and ends with /usr/lib/nx):
wget https://bugs.launchpad.net/freenx-server/+bug/576359/+attachment/1378450/+files/nxsetup.tar.gz && tar xvf nxsetup.tar.gz && sudo cp nxsetup /usr/lib/nxNow, run the nxserver setup script. I chose to use the parameter to install the default NoMachine provided encryption keys during this command so the NoMachine win-clients can connect as well as qtnx:
sudo /usr/lib/nx/nxsetup --install --setup-nomachine-keyAt this point, you have FreeNX server installed, but now you'll want to configure the FreeNX server to configure clients to use ubuntu-2d session:
echo -e "\n#Use unity 2d for client sessions\nCOMMAND_START_GNOME='gnome-session --session=ubuntu-2d'"|sudo tee -a /etc/nxserver/node.conf
Next, restart the FreeNX server to ensure it takes in the .conf file:
sudo /etc/init.d/freenx-server restartThat's it for the FreeNX server, now let's move on to the client. First, install the 'qtnx' package on Ubuntu 12.04 so we can have a client application to access the FreeNX server. You'll have to launch the Ubuntu Software Center, then click 'Edit > Software Sources' from the top menu. Then place a check by "Community-maintained free and open-source software (universe). Also, uncheck "Cdrom with Ubuntu 12.04" if it's checked. Then close the Software Sources dialog and the Ubuntu Software Center.
Now, run the commands to update your sources and install the qtnx application from the terminal (CTRL + ALT + t):
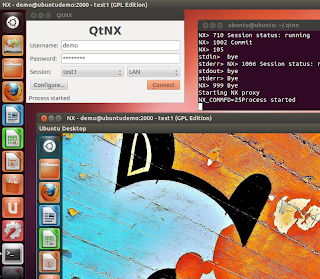
sudo apt-get update && sudo apt-get install qtnxOk, from the Unity menu or the CLI, start the 'qtnx' application. Enter the username/password for a user on the server, set the speed to LAN, then click configure. On the configuration dialog, set a name for the prfile, the hostname(or IP address) for the FreeNX server machine, the client resolution (I used 1024x768), network speed (LAN), and set the platform type to GNOME (see the example screenshot below).
Note: For the non-GNU/Linux clients, you can use nomachine.com's NX Client Free to connect to the server. Just use GNOME as the session.
That's it! Get your FreeNX connection on!
As for the version I tested with, it's: nxserver --version 3.2.0-74-SVN OS (GPL, using backend: 3.5.0)
Extra Tip: If for some reason your client wouldn't connect after testing, try deleting the entries in the ~/.nx directory. I'm not sure why this would help at all in most cases but it seemed to work for me.
Extra Tip 2: If your clients are seeing the Network Manager 'Edit' buttons as greyed out while connected - have a look at this workaround: http://ubuntuforums.org/showthread.php?t=1616355
Update 07-15-2012: Test out the script I wrote to set this up automatically. Download from HERE. Be sure to test the sha256sum of your downloaded file to ensure authenticity. The result should be: 268a735ee24171073ff97c81a320db7022c88a0597f2902f8d181b686dfbf6b9
Additional resources from and Credit to:
Cheers!
Shannon VanWagner
05-10-2012


Thanks men great post is very usefull. I recommend remmina with nx-plugin. In my opinion is the best client.
ReplyDeleteYes! Well explained! Great contribution to the community.
ReplyDeleteGreatly appreciated! Thanks! -Ian
ReplyDeleteThanks! But how can i print documents?
ReplyDeleteVery cool, thanks! Not sure I would have figured all that out on my own!
ReplyDeletevery interesting. how can I setup a public/private authentication with freeNX? I am a newbie and a I was reading that password authentication is a lot less secure than public/private authentication, I tried search how can I do that work with freeNX and QtNx but I couldn't find anything that is simple like your tutorial. do you know how to do that? I will really apreciate if you make a text explaining how.
ReplyDeleteRegards
Altieres Del Sent
Is it possible to share a screenshot that it worked from Windows?
ReplyDeleteThank you Shannon for both the FreeNX and NXFree posts. Seems you may be the expert and your posts have reinvigorated a long time project I have wanted to find a way to accomplish. I am looking to replicate a LogMeIn type solution but for GNU/Linux or Ubuntu only more secure than going through a third party. Do you know if the SERVER/remote can be configured to reach out to a CLIENT on boot and stay connected? Can multiple SERVERS be administered or shared from one location?
ReplyDeleteGreat post. This beats Xterm and works great! Go have a beer now.
ReplyDeleteGreat!! First tried an old NX-Client (3.4 xx)and got no Screen-Resolution smaller than fullscreen but with the 3.5 Version it works.
ReplyDeleteMany Thanks !
If you want to make it start in the classic gnome, in the /etc/nxserver/node.conf file. After your instructions, you will have something a bit different at the bottom. Replace with this:
ReplyDeleteCOMMAND_START_GNOME='gnome-session --session=gnome-classic'
how to configure the session in case one has XFCE and not gnome, unity, etc?
DeleteThanks for the write up!
ReplyDeleteWorked like a charm using OpenNX client on Windows 7.
ReplyDeleteHaving a little trouble with mine. Seems everything is installed and ready to go, but when I connect to the remote machine I see the NX client logo splash screen for a few seconds then I am left with a black window. Anybody seen this before? Any hints to resolve it?
ReplyDeleteI've tried various options of the
"Application > "Run the following command": gnome-session --session=ubuntu-2d"
that match the listings in:
/usr/share/gnome-session/sessions$ ls
gnome.session ubuntu-2d.session ubuntu.session
to no avail.
Worked great on Ubuntu Precise as server, running opennx client on Mac Lion. Thanks!
ReplyDeleteDavid G
This comment has been removed by the author.
ReplyDeleteFlawless install thanks to this fantastic guide many thanks :)
ReplyDeleteBonjour,
ReplyDeleteGreat post. However I bump into a strange problem running the setup script. It says line 140 cannot cd to the dirname provided.
line 140 mention something like cd dirname $0 and that directory does not exist on my system and I cant create it since this is the name of the script itself.
Any help appreciated.
Many thanks,
jb
I got a similar problem at line 140.
ReplyDelete$ sudo /usr/lib/nx/nxsetup --install --setup-nomachine-key
/usr/lib/nx/nxsetup: line 140: .: filename argument required
.: usage: . filename [arguments]
Setting up ...mkdir: missing operand
Try `mkdir --help' for more information.
Add the following and it will work -
Deletesudo apt-get install freenx-server
I had a similar problem at line 140.
ReplyDelete$ sudo /usr/lib/nx/nxsetup --install --setup-nomachine-key
/usr/lib/nx/nxsetup: line 140: .: filename argument required
.: usage: . filename [arguments]
Setting up ...mkdir: missing operand
Try `mkdir --help' for more information.
To setup custom keys with password-less login see: http://alandoyle.com/tutorials/setup-freenx-under-ubuntu/comment-page-1/#comment-5721
ReplyDeleteHmm.. the repository appears to be non-existent at this point... It used to work, but no more... any ideas?
ReplyDeletePlease shed me some light on following questions:-
ReplyDeleteOn server which I expect to remote access, I need to install;
server
node
client
On the local machine which I expect to remote access the server displaying its desktop locally, I only need to install;
client
?
TIA
similar to openssh:
on server to install;
openssh-server which includes client
on the local machine only install;
openssh-client
Ruben Nielsen, maybe try sudo add-apt-repository ppa:freenx-team/ppa
ReplyDeleteStraight forward, best howto on the net for Ubuntu NX!
ReplyDeletethanks for the great post. I got it all working on ubuntu 12.04... but when I connect to the server the system spawns a new session but what I really want to see the logged on desktop of the server machine... can you help?
ReplyDeletefor those of you who would like to shadow an existing session (share a remote desktop session) rather than have freenx spawn a new session will need to go to http://nomachine.com and follow their install instructions. This is necessary because there is a bug in the freenx server that disallows a shadow share at this time...
ReplyDeleteyou made my life easier brother... much appreciated... to use within the company... so that I don't need to access the server room (the cold) to manage some of the server I have running its a good way to go. :D
ReplyDeleteI think this ppa is defunct now
ReplyDelete