How To Set Default Grub / kernel / boot option on Ubuntu GNU/Linux 14.04
But sometimes, you just want to do one specific thing, and although the required documentation is available, it may be questionable because you can't figure out if the fix exactly matches what you need for your system.
Finding the fix online, along with too much information about how to implement it, is what happened in recent situation I encountered. A friend brought me his Gateway Laptop. The laptop was failing to boot (kernel panic) after some recent updates that were run. So I referred to my technical library, Google, and although I was able to find an answer, it wasn't immediately clear to how to implement the fix to my friend's specific situation. So for that reason, and for the reason of being able to quickly get of this jam in the future, I decided I would write up the specific steps that helped my friend out of his jam.
The problem: a kernel bug in the newest kernel that was running on his machine was causing kernel panic on startup.
The workaround: We needed to boot to a previous kernel version until a fix was released for the newer kernel. Furthermore, we didn't want to let the system accidentally boot into the newer kernel because it wasted time for us to exit the broken system and have to go back through the steps to get to the older kernel for the workaround.
While I'm at it, I want to mention that (another thing) that's great about GNU/Linux is that you can choose to boot with a variety of different versions of the Linux kernel if you wish. This open capability enables you to easily transcend any kernel bugs that may affect your particular hardware, by being able to boot to whatever you want, and get back up and running! This type of openness with the system is the reason why I've switched to GNU/Linux and have been using it on all my computers for many years now.
So back to my friend's situation: He's running Ubuntu GNU/Linux 'Trusty Tahr' 14.04 and when he ran a recent update, it installed the newest available kernel. Let's just say it was kernel 3.13.0-32-generic, for the purposes of my examples below. With this newly updated kernel booting as default, my friend's machine would fail early in the boot process with a 'kernel panic'.
Since the machine was working perfectly before this latest update, we tried booting into an earlier version kernel. To do this, we would tap CTRL then SHIFT(but not together) repeatedly just as Linux is loading up, this would get us to the grub menu where we could select a particular kernel to boot with. The grub menu, if triggered, appears just after the machine shows the screen for the brand of the computer and the POST (Power On Self Test).
Let's walk through the steps to get to the menu for kernel selection on Ubuntu 14.04 so you can see how we began working around this issue.
1.) POST screen. This appears when you very first turn on your computer. Note: The image you see will vary depending on your specific computer maker.. It also may go by so fast that you don't even see it, so be ready to use the keyboard. Just at the end of this type of screen, start tapping back and forth between CTRL or the left SHIFT key to get the menu in #2 below.

2.) The GRUB menu with 'Ubuntu' as the default selection. We could press "e" at this prompt, and edit the Linux startup commands in grub, but unless we've memorized the specific text of the boot option we need, that idea may be difficult to implement on the fly. Instead, at this point we'll hit the down arrow on the keyboard to select "Advanced options for Ubuntu" (see next image):

3.) In this view, I've hit the down arrow on my keyboard to select "Advanced options for Ubuntu". I then hit ENTER to get all the options to boot to previous kernels that are still installed. Ubuntu keeps a number of previous kernels installed after updates, to help you if you ever have to fallback to an earlier version.

4.) Here's the menu with the Kernel selection menu. We want to boot to the 3.11 kernel because we tried and it's the one that boots without error for us. So we'll use the down arrow to move down to the 3.11 kernel (see next image).

5.) Here's the screen with the older kernel (kernel 3.11) selected, now we hit ENTER to boot the machine to that kernel, and when it boots, we give our colleagues a nice high-five because we were able to get the booting and running again! Go GNU/Linux! We've now learned about something that can be helpful to others that may encounter a similar situation.

So, in the case of my friend, once we booted to the previous kernel, his machine loaded up without issue. So this is how we will work around the kernel issue. The next steps would be to file a bug (or add input to an existing bug) at launchpad.net to get the issue for the newer kernel fixed. The actual fixing of the new kernel will likely take time, but that's ok because we can use the workaround and still continue to enjoy our awesome Ubuntu GNU/Linux system!
But how do we make our machine boot to a specific kernel for future boots until the problem is fixed, so we don't have to worry about the system failing to boot? There are a few ways, but one way is to add the previous kernel as the default boot option via the /etc/default/grub file.
I'll explain how to do that below..
First of all, as seen in #2 above, Ubuntu 14.04, it's noteworthy to point out that Ubuntu now nestles the previous kernel boot options under a 'submenu' named "Advanced options for Ubuntu". In a separate, more advanced subject, another thing that's new is that it's no longer recommended to use the label of a grub.cfg menuentry to set it as default because it may cause a problem if it contains special characters in it. So instead, we should use the value for "$menuentry_id_option" that appears in the menuentry we want to select for the default boot option.
Sounds pretty confusing right? It's actually pretty straight forward, save for a few more steps needed to make the edit to the appropriate file to affect the changes. We simply have to build the GRUB_DEFAULT= value using the $menuentry_id_option for the submenu, then add ">" (no quotes), then add the $menuentry_id_option for the actual kernel boot selection we want to boot to behind it. For example:
GRUB_DEFAULT='gnulinux-advanced-7ec5403e-7a25-47a1-bf0c-1a7c955dc590>gnulinux-3.11.0-19-generic-advanced-7ec5403e-7a25-47a1-bf0c-1a7c955dc590'
1.) So first, let's get the $menuentry_id_option for the 'submenu' named "Advanced options for Ubuntu". Hit CTRL+ALT+t to open a terminal and run:
grep submenu /boot/grub/grub.cfg
Example output (with the "id" text we need highlighted):

2.) Next, we get the $menuentry_id_option for the 3.11.0-19-generic kernel boot entry that we know will work with my friend's computer and we highlight the id for it. Hit CTRL+ALT+t to open a terminal and run:
grep gnulinux /boot/grub/grub.cfg
Example output (with desired value highlighted):

2.) In the Terminals where you ran the commands for #1 and #2 above, use your mouse to select the text after "$menuentry_id_option" (everything inside and including ' ' ), then we'll use CTRL+SHIFT+c to copy them from the Terminal (one by one) and paste them into /etc/default/grub to build our default entry, in another step below. Example values to be copied:
'gnulinux-advanced-7ec5403e-7a25-47a1-bf0c-1a7c955dc590'
'gnulinux-3.11.0-19-generic-recovery-7ec5403e-7a25-47a1-bf0c-1a7c955dc590'
3.) Now, with new Terminal, we'll backup, then edit /etc/default/grub file, and then use the values from the first two terminals above to make the default entry for boot.
Make a backup of the file, to our home directory:
sudo cp /etc/default/grub ~
Now edit the file:
sudo vi /etc/default/grub
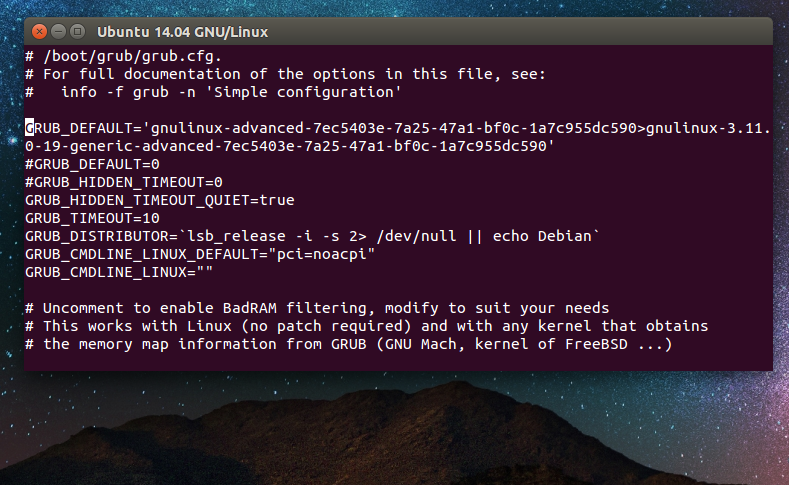
4.) Edit the default entry in your /etc/default/grub file so your system will boot to the previous kernel by default. Use your arrow keys (or h j k l ) to move to the line with "GRUB_DEFAULT=0". Hit Y to copy, then P to paste the line again. Next, use the keyboard arrow keys, or h/j/k/l to position your cursor in front of the lower "GRUB_DEFAULT=0", then hit i for insert mode, then type # in front of the line to comment it out. Hit esc to get out of insert mode, then position your cursor over the 0 in the upper entry of GRUB_DEFAULT=0, then hit x to delete "0". Now, hit A to insert after the end of the line with "GRUB_DEFAULT=". Now, you'll copy the value from Terminal in step #1. above(highlight text, then use CTRL+SHIFT+c), then switch back to the current Terminal and hit CTRL+SHIFT+V to paste it in, then type ">" (no quotes), then copy the 3.11 kernel text from Terminal in step #2 above and paste it in after the ">". Then hit esc again, then type ZZ or :wq to save/quit. Example (also see image below):
GRUB_DEFAULT='gnulinux-advanced-7ec5403e-7a25-47a1-bf0c-1a7c955dc590>gnulinux-3.11.0-19-generic-advanced-7ec5403e-7a25-47a1-bf0c-1a7c955dc590'

5.) IMPORTANT: Now that we have the default kernel setting in place in the /etc/default/grub, we must update our grub configuration for the changes to take effect:
sudo update-grub
You'll see something like this:

6.) Reboot the computer, then verify the system has booted to the new default kernel by launching CTRL+ALT+T to open a Terminal, then run the command to check the loaded kernel:
uname -r
The output from the command should show something like:
3.11.0-19-generic
In closing: You'll want to keep an eye out for kernel updates as you update your system. The reason is that once the newer kernel comes out, like the one with the appropriate update to fix the original problem that's outlined in this post, you'll want to revert the changes outlined in the post to let your system to boot to the default kernel again. Basically you'll just go into /etc/default/grub, place a "#" in front of your custom kernel specified in #4 above.
GNU/Linux rockin!! Get your Freedom on!!
Shannon VanWagner
08/10/2014


Comments
Post a Comment
Thanks for commenting. Comments are moderated by the blog owner and will appear once approved. Need to email me directly? Go to http://shannonvanwagner.com/email-me.php