 |
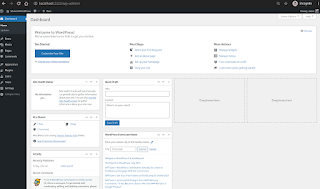
| WordPress Admin Page |
WordPress, a free open-source content management system (CMS), is one of the most popular platforms for blogs and websites in the world today. The official website for WP is wordpress.org. WP is a spectacular platform! This great product, with all it's ability to be customized, its high-quality visual appeal, its super-duper functionality, its multitude of themes, and so much more, it's so awesome that this feature-rich platform is Free and Open Source for everyone to use!
WordPress is made even more powerful due the plethora(literally 10s of thousands) of plugins (both free and paid) that are available for the platform!I wanted to take a look at this fabulous software for myself so I made some notes for installing WP on one of my Manjaro Linux 5.10.59-1-MANJARO x86_64 21.1.0 Pahvo machines for a test. Installation was pretty quick and easy, and I only encountered a few snags in the process. I'll point out how to work around the issues below.
As a bare minimum to get WP up and running on Manjaro Linux, we need to install WP, PHP, and MariaDB, here's the command to use in the terminal (Internet connection required, obviously. See fig. 1 for example.):
$ sudo pacman -S wordpress php mariadb
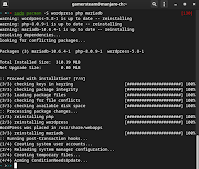 |
| fig. 1 Installing Packages |
After confirming the install of the above packages, we move on to some initial setup on the MariaDB for use:
$ sudo mysql -u root -p
For the above command, I had to authenticate as my CLI user to allow sudo, and then, since this is just a test database setup, I simply hit Enter at the prompt for "Enter password:", to set the MariaDB root password to blank (See fig. 2 for the example.).
Also, here's where I hit my 1st snag. When attempting to set the root password for the MariaDB, I was presented with the error message 'ERROR 2002 (HY000): Can't connect to local server through socket '/run/mysqld/mysqld.sock' (2)'.
 |
| fig. 2 - Set MariDB root passwd shows an error. |
This error happened because the MariaDB service was not running. So, time to break out the systemctl command to get things up and running.
First we check the status of the MariaDB service. Shows as disabled and inactive in fig. 3:
$ sudo systemctl status mariadb
 |
| fig. 3 - MariaDB service not running. |
Next, we enable the MariaDB service. fig.4
$ sudo systemctl enable mariadb
 |
| fig. 4 - Enabling the MariaDB service |
Next, we'll try restarting the MariaDB service to see if everything comes up. fig.5
$ sudo systemctl restart mariadb
 |
| fig. 5 - MariaDB restart fails |
As we can see in fig. 5, when we tried restarting the MariaDB, it fails. After again checking the status of the MariaDB service, it now shows a specific error, "[ERROR] Can't open and lock privilege tables: Table 'mysql.servers' doesn't exist" when attempting to restart the MariaDB service. Turns out I had to run the mysql_install_db executable and set the datadir path to get things squared away (see fig. 6):
$ sudo mysql_install_db --user=mysql --datadir=/var/lib/mysql
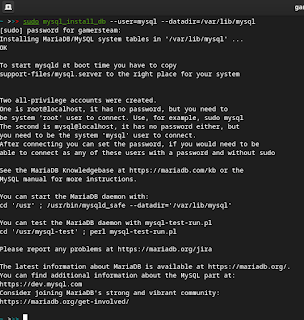 |
| fig. 6 - mysql_install_db script, set datadir=/var/lib/mysql |
And now we can see that MariaDB restarts without error and when checking status for it, now shows active (fig. 7):
$ sudo systemctl restart mariadb;sudo systemctl status mariadb;
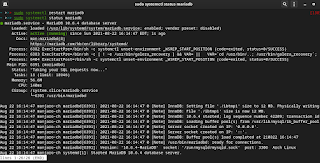 |
| fig. 7 - MariaDB shows as running. |
Now we'll setup a database for the new WP site, I'll call it 'shannon_wordpress_db', the username to access will be 'WP_user' and the password will be 'demo' (don't use a weak password like this for a real site!) See fig. 8:
$ sudo mariadb -uroot -p -e'CREATE DATABASE shannon_wordpress_db; \

GRANT ALL PRIVILEGES ON shannon_wordpress_db.* TO "WP_user"@"localhost" \

        IDENTIFIED BY "demo"; FLUSH PRIVILEGES;'
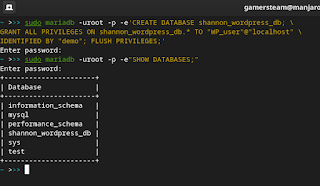 |
| fig. 8 - mariadb SQL to create WP DB and set login |
At this point, I wanted to test access to my newly created WP database before I setup WP for PHP. I'll use the 'SHOW GRANTS' command to ensure access (fig. 9):
$ mariadb -uWP_user -p"demo" -D"shannon_wordpress_db" -e"SHOW GRANTS;"
 |
| fig. 9 - Testing access to new WP DB |
Ok, at this point, we're ready to setup WP. As shown above, WordPress was installed into '/usr/share/webapps/wordpress' on installation by pacman. Note that we'll have to make any changes to the default directory for WP using sudo since the permissions are restricted for the default directory. In the example below, I first copy the 'wp-config-sample.php' file to 'wp-config.php' so we can use it as our configuration file. I also used grep to show the pertinent database connection fields for WP (fig. 10):
$ sudo cp /usr/share/webapps/wordpress/wp-config-sample.php /usr/share/webapps/wordpress/wp-config.php
$ grep "DB_[N*|U*|P*]" /usr/share/webapps/wordpress/wp-config.php
 |
| fig. 10 - Create wp-config.ph and show DB connection fields |
Now we'll edit the wp-config-php file using sed and replace the database name(shannon_wordpress_db), db user(WP_user), and db password(demo) for our WP database (fig. 11):
$ sudo sed -i -e 's/database_name_here/shannon_wordpress_db/g' -e 's/username_here/WP_user/g' -e 's/password_here/demo/g' /usr/share/webapps/wordpress/wp-config.php
$ grep "DB_[N*|U*|P*]" /usr/share/webapps/wordpress/wp-config.php
 |
| fig. 11 - wp-config.php edited with sed command |
At this point we're ready to test the connection to our WordPress install and finish setting it up. First we can launch PHP web service from within a directory by cd'ing to it, then run php -S command with the port setting (to end, hit CTRL+c). After that, we'll open a web browser and attempt to navigate to the served site, in this case http://localhost:3456 (fig. 12):
$ cd /usr/share/webapps/wordpress; php -s localhost:3456
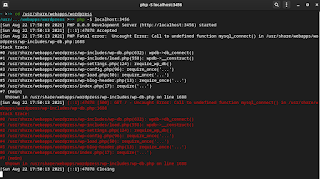 |
| fig. 12 - using php to serve wp, and error msg shown after attempting to access from browser |
In fig. 12 what is shown is the result of my attempt to access localhost:3456 from the web browser. We can see there is an error 'GET / - Uncaught Error: Call to undefined function mysql_connect() in /usr/share/webapps/wordpress/wp-includes/wp-db.php:1688' both in fig. 12 (where the WP site is served by PHP), as well as below in fig. 13 when we attempt to browse to http://localhost:3456.
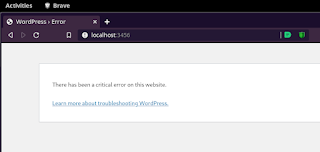 |
| fig. 13 - WordPress page fails due to DB connection issue (mysqli not enabled) |
As it turns out, WP cannot connect to the database because 'mysqli' extension is disabled (commented out with the ";") in /etc/php/php.ini. So we'll first check to see if mysqli is uncommented in the php.ini file and then use sed to change it to drop the preceding semi-colon, which uncomments it. We'll then check again with the php -m command to see if it's loaded (fig. 14):
To show if the mysqli php module is enabled use either command below and if it comes back blank, mysqli is not enabled:
$ php -m|grep mysqli
Or:
$ grep ';extension=mysqli' /etc/php/php.ini
Here's how to use sed to update the php.ini file and uncomment the mysqli module so it can be used:
$ sudo sed -i -e 's/\;extension=mysqli/extension=mysqli/g' /etc/php/php.ini;
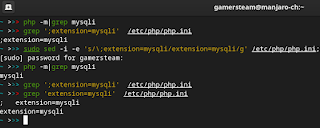 |
| fig. 14 - Shows whether mysqli is loaded plus using sed to edit the php.ini |
After the mysqli module is enabled in php.ini, we'll go back and serve up the WordPress site from the /usr/share/webapps/wordpress directory with the php -S localhost:3456 command once again and then try to navige to http://localhost:3456 with our web browser. As you can see in fig. 14 and fig. 15, things are working now!
 |
fig. 14 - using php -s localhost:3456 from the /usr/share/webapps/wordpress directory to serve wordpress
|
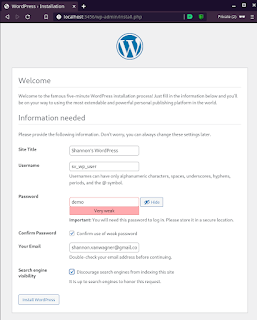 |
| fig. 15 - WordPress now loads the initial setup page at http://localhost:3456 |
And now we have a running WordPress Site! Some additional screen clips below show the next steps for setting up WordPress using the browser:
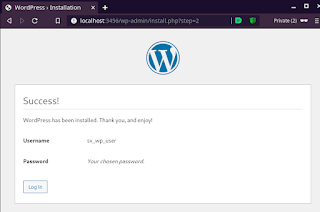 |
| fig. 16 - Step 2 after initial setup(which takes a minute because it builds the database structure for the website) |
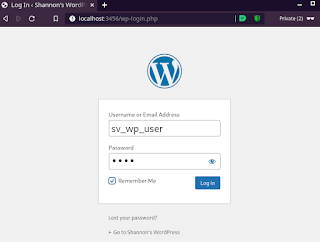 |
fig. 17 - Logging in for the first time!
|
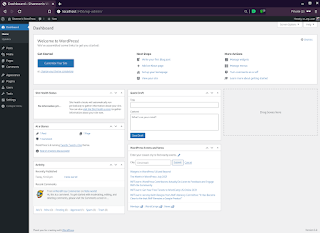 |
| fig. 18 - Wordpress configuration page |
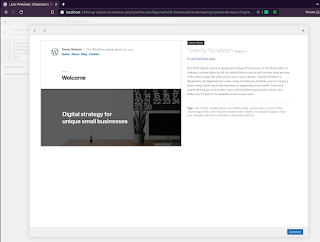 |
| Checking out the themes for WordPress |
So that's it for a basic test install of WordPress! Further steps would include installing a webserver, e.g., Apache, installing modules for WordPress, hardening the install for security, assigning a DNS entry for easier navigation, etc. I hope something here was useful for you!


Comments
Post a Comment
Thanks for commenting. Comments are moderated by the blog owner and will appear once approved. Need to email me directly? Go to http://shannonvanwagner.com/email-me.php